FAQ
Wi-Fi
Neo and Clea with WiFi. Installation and tips for use with the Adax WiFi app.

 Which WiFi thermostat have I got?
There are two kinds of Adax WiFi thermostat.
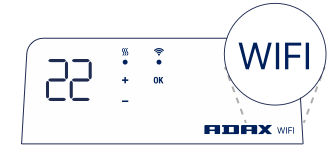
Generation 1: Has WiFi only, see photo of thermostat:
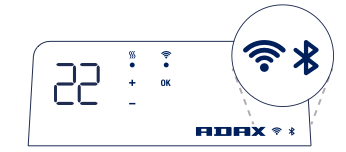
Generation 2: Includes both WiFi and Bluetooth for easier installation. Launched late 2020, this model has the WiFi and Bluetooth symbol on the display:
Special character/Password and SSID
If the app says “Incorrect WiFi credentials”/Norwegian: “Ugyldige wifi-koder” it usually indicates that the WiFi password was entered incorrectly. You most probably have a special character such as !@#;? etc, a space or ØÆÅ in either the username (SSID network name) or password on your WiFi network. Please double-check your password and try again.
Security Note: Ensure your password follows security best practices, avoiding weak or easily guessable passwords. We do not support the use of emojis in usernames or passwords.
WiFi with Bluetooth (WT2)
New thermostat with Bluetooth for simpler installation.
How do I reset my device?
- For Generation 2 (WT2) devices: Press and hold the “+” and “OK” buttons until “Reset” scrolls across the display.
- For Generation 1 (WT1) devices: Press and hold the “+”, “-“, and “OK” buttons until “rE” appears on the screen. Look closely, as “rE” blinks quickly once, then the screen will display 20 degrees.
How do I set the heater to paring mode?
For Generation 2 (WT2) devices: Press and hold the “OK” button on the heater for four seconds until the blue light starts blinking.
For Generation 1 (WT1) devices: Press and hold the “+”, “-“, and “OK” buttons until “rE” appears on the screen. Look closely, as “rE” blinks quickly once, then the screen will display 20 degrees.
How do I add my Generation 2 (WT2) device to the Adax Wi-Fi app?
Prepare for Setup:
- Ensure your phone is connected to a 2.4GHz Wi-Fi network.
Note: The WT2 device only supports 2.4GHz networks; 5GHz will not work.
- Download and open the Adax Wi-Fi app.
Follow the on-screen instructions in the app to complete the setup process.
How to replace a thermostat?
If you need to replace a faulty thermostat, or change to a newer version, you can do it yourself quite simply.
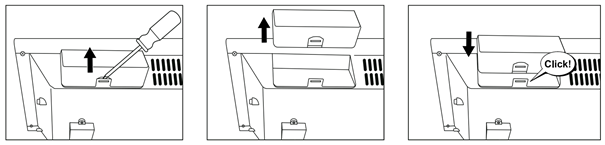
On the back of the thermostat, there is a simple “lock.” Tilt the clip to release the lock and lift the thermostat up (see picture).
Note: If there is an issue with a heater, it’s usually related to the thermostat rather than the heater itself.
Does it cost anything to use the Adax Wi-Fi App?
The Adax Wi-Fi app is available for iOS/Apple and Android devices. Both the app and the service are free to use. You can control your panel heaters from anywhere in the world, as long as you have at least 3G coverage on your mobile. Adjust and set up a temperature program, so you arrive at a warm cabin, house, office, or apartment.
Tips when connecting to WiFi without Bluetooth
How do I add my Generation 1 (WT1) device to the Adax Wi-Fi app?
Prepare for Setup:
- Ensure your phone is connected to a 2.4GHz Wi-Fi network.
Note: The WT1 device only supports 2.4GHz networks; 5GHz will not work.
- Download and open the Adax Wi-Fi app.
- Follow the on-screen instructions in the app to complete the setup process.
Manual Connection (if needed):
- If the automatic connection doesn’t work, the app will prompt you to connect manually to the “SH-ADAX” network.
- Exit the app and open your phone’s Wi-Fi settings.
- If you do not see “SH-ADAX”, try turning Wi-Fi off and then on again to refresh the list.
- If the network still does not appear, press the “+”, “-“, and “OK” buttons to reactivate the Wi-Fi module.
- Connect to the “SH-ADAX” network using the password “magicpass123”.
- While still connected to “SH-ADAX”, return to the app. The setup process should continue automatically.
Info about routers and networks when connecting the heaters
Most routers have two ways to connect to the internet, either via 2.4GHz or 5GHz band.
You will see two almost identical network names “Mitt-Nett” and “Mitt-Nett-5G” in the Wi-Fi list on your smartphone. Most 5GHz are marked with “-5G” in the network name. The Adax heaters “talk” only on the 2.4GHz band, so the phone must be connected to the network without “-5G” under installation.
On new Mesh routers, the 2.4 GHz and 5GHz bands are merged into just one SSID network name. It will then be difficult to see if the phone is connected to either the 2.4GHz or 5GHz band. Some Mesh routers like Jensen Onmi have a feature in the app where routers can be “locked” to only transmit at 2.4GHz. PS: If the smartphone is connected to 5GHz band, the heater will not find it, and neither will it be installed.
Adax Wi-Fi can be used with 4G/mobile routers on eg cabins without a fixed internet.
An oven will normally use between 100 – 150MB per month per heater.
I will change router and/or network names and passwords. What do I have to be aware of?
I plan to change my router and/or network names and passwords. What should I be aware of?
Please check your heater firmware and app version. You can find the app version on the ‘Account’ screen in the app.
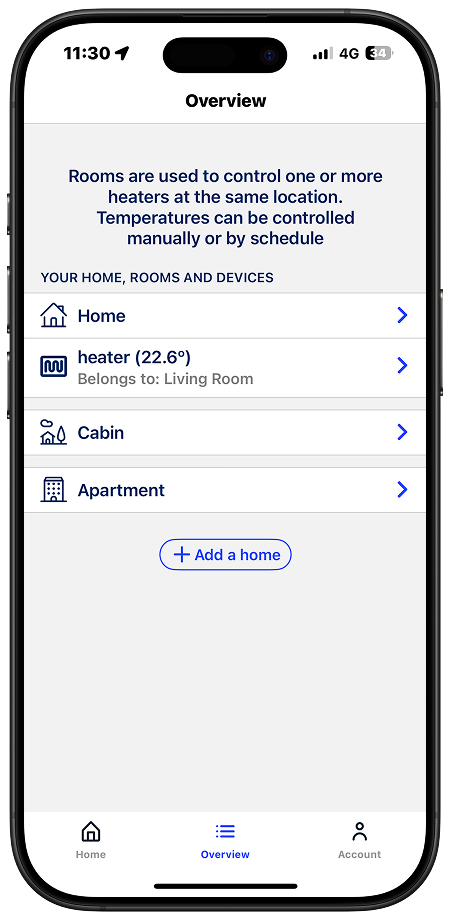
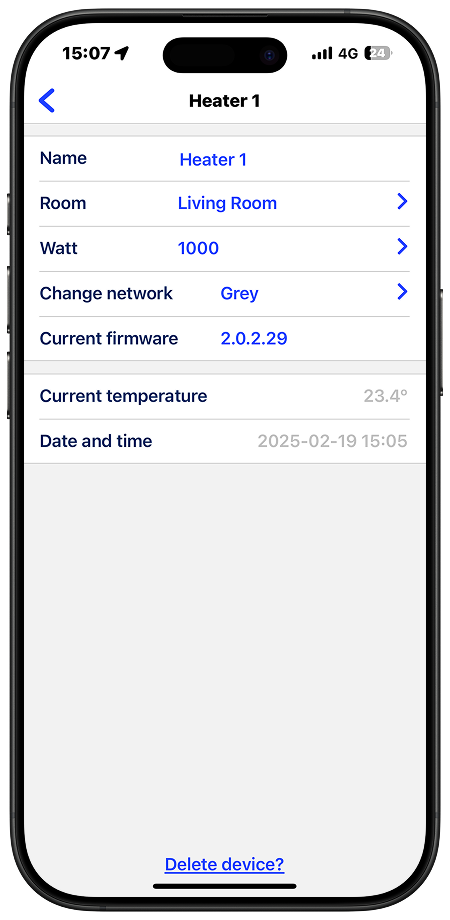
To check the heater’s firmware version, go to the “Overview” screen and select the heater you want to check.
If your heater has firmware version 2.0.2.26 or higher and app version 4.0.8 or later, you will be able to change network following these steps:
- Go to the overview screen and select the heater you want to change the network settings for.
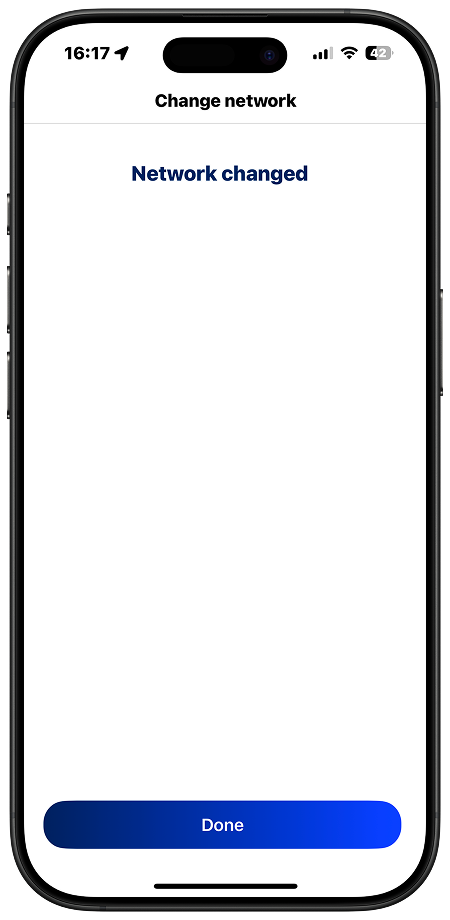
- A new screen will open, displaying the “Change Network” option along with the SSID the heater is currently connected to.
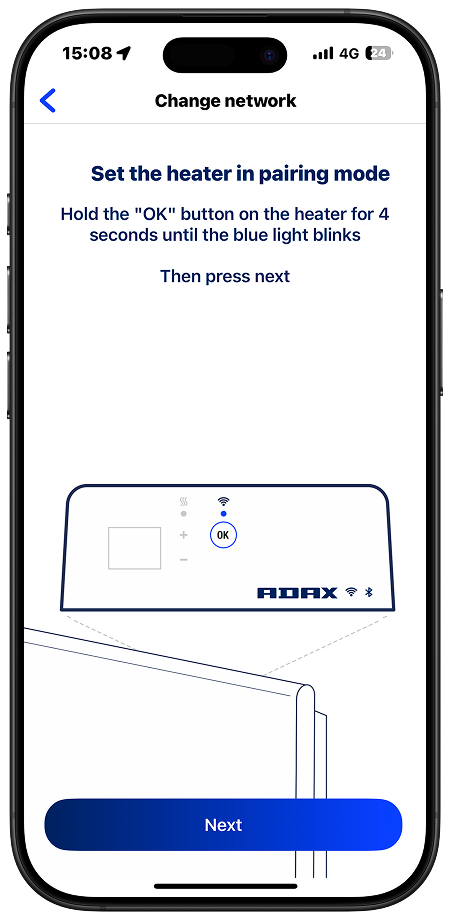
- Tap on the “Change Network” text , and you will be prompted to another screen asking you to set the heater in pairing mode.
- Follow the instructions to enable pairing mode, then press “Next” on the screen.
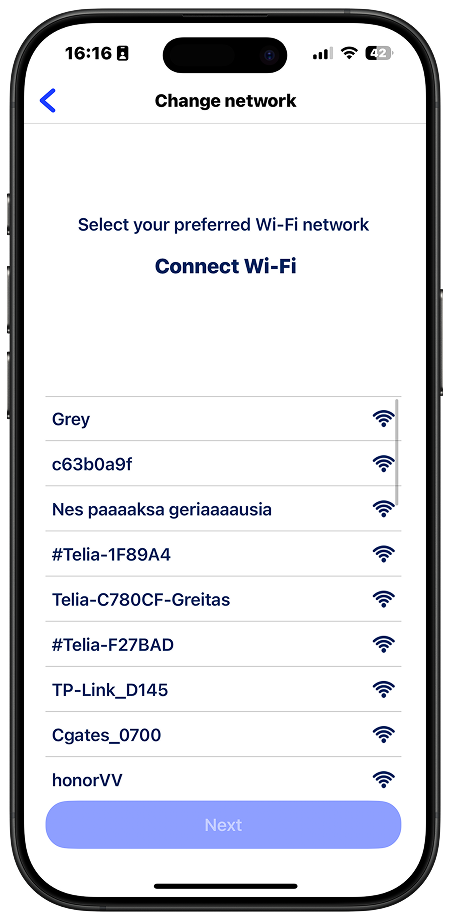
- After approximately 10 seconds, a screen with all available SSIDs will appear.
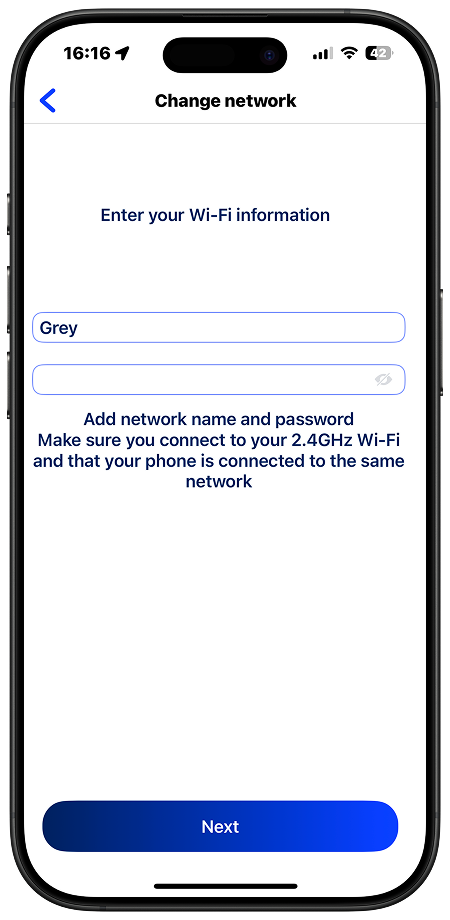
- Select the SSID you want your heater to connect to, press “Next,” enter the network credentials, and press “Next” again.
- That’s it! You have successfully changed your heater’s network settings.
For older firmware versions, if you change your router or password, you must delete your heaters from the Adax Wi-Fi app, reset them, and then add them back to the app.
I want to use the heater manually. What are the main functions of manual use?
When using the heater manually, the main functions you can control are:
- Set temperature: Adjust the temperature by using the “+” and “-” keys on the thermostat.
- Keypad lock/child lock:
- WT1 (Wi-Fi only): To activate or deactivate the keypad lock, press and hold the “OK” key for 5 seconds until “CC” flashes. Repeat the process to deactivate the lock.
- WT2 (Wi-Fi and Bluetooth): To activate or deactivate the keypad lock, press and hold the “OK” key for 5 seconds until “CC” flashes. Repeat the process to deactivate the lock.
Info about firmware and thermostats - do I need to upgrade regularly?
Adax has supplied Wi-Fi thermostats since Fall 2016. The thermostats have their own software – called firmware. The firmware controls the connection to the Adax Wi-Fi app and all related functions. Firmware is continuously updated to support new features and bug fixes to support updates from iOS/Apple and Android. We recommend that you always have the latest version, details can be found under “Product” from the menu in the Wi-Fi app.
If previous versions have been installed that end at 1.0.0.24 / 0.25 / 0.25 / 1.10 / 1.11 we would recommend upgrading to later versions as 1.17. New versions, 1.19 and 1.20 are planned with new functionality. New versions will make it easier to install with custom functionality to Apple/iOS and Android phones.
I experience errors/problems with the thermostat
If you experience problems with connection or other errors with the thermostat, you may have an older version of firmware installed. The thermostats are easy to replace, it will not be necessary to replace the entire heater, only the thermostat unit. On the back side of the display on the thermostat there is a simple “lock”- tilt out the clip lock and lift the thermostat up.
At the bottom of the thermostat box unit there is a label, and four numbers at the top right corner, for example “1726” are year and week when the thermostat was manufactured.
- Thermostat display flashes – update to the latest firmware.
- Displays the front display 88 and not 18 – update easily to the latest firmware.
- If the heater is used manually without connection to the app with the above problem, the thermostat must be replaced, contact customer support at info@adax.no.
- Lose contact with the app – thermostat temperature shows “-“. Switch oven on / off with switch.
- If it is desired to use the heater only manually without the need to use the app/connection via smartphone, the thermostat can be replaced with a digital thermostat without Wi-Fi feature.
Various tips and additional features
- Reset to factory settings – Hold “+” “-” and “ok” until the display flashes with “rE” with a quick flash and then displays 20 degrees in the display.
- In the event of a power failure, the oven will start heating at the last registered temperature when the power returns.
- When the oven is connected to the Wi-Fi app, child lock is activated via the Wi-Fi app and not manually on the thermostat.
- Turn the display light on/off. This function turns on/off by holding the 6 (-) and 4 (ok) buttons for 5 seconds. The light (numbers) will turn off after 30 seconds and light up again by pressing any of the (+, – or ok) buttons.
Smart Home integrations and Open API
Adax works actively with integrations to cover market requirements.
We support the following third party integrations via the Adax WiFi app:
* Google Home
* Athom Homey
* Tibber
* FutureHome
* Amazon Alexa
Our Heaters Also Support API Integrations:
- Remote API (Works with all WiFi thermostats)
- Available from app version 3.5.1 and onward.
- Documentation and tips for integration: https://adax.no/wi-fi/api-development/
- Local API (Only for WT2 thermostats)
- Documentation and tips for integration: https://adax.no/wi-fi/api-development/


![]()
Troubleshooting
rE flashes on the display. What does that mean?
Adax, Glamox and Neo’s digital thermostats (DT) in software versions S2 and S3 flash rE – 17 – C on the display after power has been cut off for more than 24 hours.
The heater will continue to provide heat, but only for example at 17 degrees or at the lowest confirmed temperature to avoid unexpected electricity consumption. All programs are deleted and must be reset.
The heater is not heating and the display is dark?
Electricity supply
Check electricity supply to the heater first. All heaters must have a thermostat to work. Heaters with no thermostat must be tested with a thermostat fitted. Set switch to ON. Set thermostat to max. If the radiator gets warm, it is working correctly. If it does not, replace the thermostat when possible and test again. If it still fails to get warm, the heater or thermostat need replacing. Contact your dealer or our Customer Service.
Thermostat not working. What should I do?
Fit the thermostat on the heater when necessary and perform the test described above. Digital thermostats can be reset by holding the <F> while switching on at the on/off switch. Hold the <F> down for 15 seconds. Turn thermostat up to max. If the heater gets warm, turn thermostat down to the point at which it starts to cool. Repeat a few times. If heating starts/stops around the same point, the thermostat is most likely working.
Heater disconnects before wanted
Reset thermostat to a higher temperature. If it works then, it is working correctly. The thermostat can be calibrated. See the instruction manual for correct procedure.
The fan motor is not working. What should I do?
Check electricity supply to the product. Connect to the socket and set the thermostat to max. If the motor or heating element do not work, replace the heater. Contact your dealer or our Customer Service.
How can you get in contact with us?
You can reach us by phone or mail.
Call our Customer Service : +47 33771750
Customer Service centre is open Mon–Fri from 09:00 to 15:00
You can also send us a mail to info@adax.no
Our products
How can I choose the right product?
Room and output
Select a product you like – it will be on your wall for many years! Our product calculator can help you find the right product based on your room size.
More details:
Start with the size of the room (number of square metres). We recommend approx. 60-70 watts per square metres for an average home.
Depending on whether your home is well-insulated or not, the requirement can vary between 40 to 140 watts per square metres.
For children’s rooms, we always recommend more watts than the recommended requirement, because the surface temperature of the product will be lower
Read more in our heating guide HERE
Does ceiling height make any difference to choice of heater?
Yes. All our recommendations are based on a normal ceiling height of 2.4 metres. If your ceilings are higher, choose a radiator with higher watt output. For example: if you are going to heat a 10 square metres room, we normally recommend an 800 W panel heater. But if the ceiling height is 3 m, you should choose heaters with minimum 1000 W.
What are the biggest differences between the different Adax Neo series?
S1
Radiator always reverts to the default setting of 22 degrees in the event of power loss lasting more than 1 hour.
S2
In the event of power loss lasting more than 24 hours, the heater will always revert to the lowest confirmed temperature. The thermostat has 3 different mode options: HO (Home) – OF (Office) – CA (Cabin).
S3
The same program as S2, but with a few minor production-related improvements.
S4
Has the same memory time as S2 and S3, i.e. remember programming for 24 hours. In the event of power loss lasting more than 24 hours, the heater will always revert to the last temperature set. The heater thermostat has 2 different mode options: HO (Home) and OF (Office).
Warranty
Most of our products have a 5-year warranty.
Individual fan, oil radiators and shoe driers can have a 2-year warranty. Please see the product pages for more details on warranty for each product.
Can I mount two panel heaters by the side of each other?
We recommend a minimum of 5 cm space between two panel heaters.
Get more help for placing heaters HERE
How can I find out which Adax product I have bought?
There is a label with all the details of the product on the back or underside of all our products. If you are still unsure, contact us on: +47 33 77 17 50 or send a mail to info@adax.no
Product colour codes?
RAL and NCS codes
Adax and Glamox products come with the following standard colours:
Glamox 3001 – Ral 9010/White
Adax VP10, VPS9, VPS10, VP11 – RAL 9010/White
Adax Neo, Neo 2, Clea, ECO – RAL 9016/White
Adax Neo – RAL 3020/Red
Adax Neo – RAL 9005/Black
Adax Neo – RAL 9006/Silver
Eco Basic/VPS10 /VP11
Open Window - the thermostat flashes
Open Window – activated
When your thermostat flashes twice green and twice red, it indicates that the radiator has registered an “Open Window”
- How to deactivate the “Open Window” function:
Rotate the selector wheel to the hand symbol. Press to confirm - Turn the selected to 13 degrees
- Double tap on the selector wheel (quickly) twice in succession – the green light will flash.
- Open Window is now activated – Green light will come on
- Open Window deactivated – Red light comes on
- Switch off Open Window function: Rotate the selector wheel to the LEFT to switch off – red light will come on – press selector to confirm. Green light will flash.
Digital thermostat
Use and troubleshooting for radiators with Digital thermostat. Neo Basic, Neo and Clea + Iver and Famn
Series x.1 Manual use
For manual use: Press several times on > until nP shows in the display Tap: OK You can now set temperature simply by tapping + and –
Series x.2
For manual use: Press several times on > until nP shows in the display Tap: OK You can now set temperature simply by tapping + and –
Setting P1 - night reduction - 7 days
1. Switch radiator on.
2. Press and hold OK key for approx. 3 seconds until td shows in the display.
3. Tap OK. Enter day and time. Confirm by tapping OK. For example: to set Thursday 0930: Press + until day 4 shows in the display, confirm with a quick OK, then press + until 9 shows in the display and confirm by tapping OK. Press + until 30 shows in the display, confirm by tapping OK. You have now set day and time. Press and hold OK for 3 seconds, you have now exited the menu and the temperature will show on the display.
4. Press for 3 secs on OK and use the arrow keys < > until P1 shows in the display. Confirm by tapping OK, P1 will show. Confirm by tapping OK again. You must confirm that you want to program program P1.
5. 7d now shows on the display. Confirm by tapping OK. This means that you want to set night reduction for all 7 days in the week.
6. 0 now shows on the display. This is 0000 (midnight). You can now set reduce (-) or normal temperature (+) for the whole day/night. Simply tap on the – key, and then on > to go to the next hour. You have now set the reduced temperature for that hour. Repeat, i.e. tap the – key and > to go to 1, 2, 3, 4, 5 and 6. Then tap + and > on 7, 8, 9 and so on up to 23, when you will have to tap – and > once more. 0 will now show in the display again, and you have set night reduction from 23:00-06:00, with comfort temperature for the rest of the time.
7. Tap OK to return to the main menu. 7d will show on the display. Hold OK for 3 seconds to exit the main menu.
8. Tap > until you see P1 on the display, and then tap OK. You have now selected the use of P1. The radiator will automatically use the last temperature set as comfort temperature, and 17 degrees as reduced temperature.
How to change comfort temperature: Hold OK for 3 seconds to enter the main menu. Tap > until you see Co on the display. Tap OK, use + and – to set the desired comfort temperature, confirm by tapping OK.
How to change reduced temperature: Hold OK for 3 seconds to enter the main menu. Tap > until you see Co on the display. Tap OK, use + and – to set the desired reduced temperature, confirm by tapping OK.